


.jpg.0297f3c94c08a11c89dc57de58a18b00.jpg)
TCon
Regular Member
-
Joined
-
Last visited
Everything posted by TCon
-
-
So far as i know they are not usually a known failure point so id look out for a second hand unit. Shouldnt be hard to find. Wouldnt want to ask how much a new one would be 😬
-
It would depend on the brand and place were you purchase them. Typically its best to buy a decent set. I paid for a set as a gift for my son in law some time back for his E90 and it cost me 100 euros. You can sometimes need clips that the new bulb sits into also. These are an additional cost of about 10 quid. I cant recommend any brands yet but I am looking for a decent set for myself so if I can recommend any in time i'll let you know, likewise if you find any post it up here.
-
Scrap yards? Maybe facebook market place? Plenty of aftermarket ones available but they will be costly after you include shipping and painting.
-
What is the issue with them? are the bulbs dim, are the lens faded? Have you thought about going to LED bulbs?
-
Dunno but id definitely give you 20 quid for it 😆 Are you looking to sell it on then?
-
Hi Bill, Ive done this on my F11 a long time ago (almost five years) when some ##### damaged mine and its a bit of a pig for just a bulb, but not as bad as the reversing light bulb 😠. You need to take off the inner covers to reveal the rear of the lighting housing which is held in with if memory serves me right three small nuts (size eight spanner i think). The unit is quite fiddly to remove as its a tight fit but not too bad, and there is a simple connection to remove for the power source. But you say you have to change a bulb but isnt the indicators LED's as opposed to a halogen bulb?🤔 I could be wrong as it was a long time ago when I did it. I agree that there are very little videos or info on the F11's. I spent weeks looking to find out how to change the bulb on the tailgate to illuminate the ground when the boot is open and didnt want to force it. Best of luck with it.
-
Try AutoDoc, they are doing good deals lately on oils. I got a great deal on Mobile 1 recently which was surprizing considering the price of everything going up lately.
-
I purchased jack pads from amazon. They were only about 5-7 pounds each. works great and fits perfect. I keep them in my car in case I get a flat tyre and then give them to the garage to use so they dont damage my jacking points.
-
Hi Mark, I dont know if you have gotten this sorted by now or not but just to add my own experience to this as it may help someone. I had a similar issue myself on my F11, were there was a drone from the rear at speeds of around 50mph. I also thought this was coming from the diff, and as Greydog said, the changing of one is about three hours work and can be expensive, even if you do it yourself. Ive done it on a E90 3 series in the past and didnt fancy doing it again on the ground. I did check it myself for all the usual suspects, including the rear wheel bearings which showed no signs of movement. I crossed my fingers and changed the diff fluid and added an additive from LIQUI MOLY to it but sadly this didnt improve the noise. I had suspected it was actually the rear bearings as the fluid taken from the diff was only 12 months old and changed by myself and when I did the latest change the fluid wasnt grey and didnt appear to have any particles in it. So at this point I decided to change the rear bearings anyway as they were probably in since new (2013) and they have a tendency to fail anyway and this car is getting all rubber bits and known common faults changed over time anyway. What i had discovered was that the rear bearings were seized into position because they had failed some time ago but didnt make enough noise to be noticed. They were so badly seized that I couldnt get them off so I sent the car to a local garage that I know well and he also couldnt get them off. In the end I found a specialist with a really big hydraulic pullers (normally used on VW transporter front bears apparently) who made light work of the job. Did this get rid of the groaning coming from the rear of my car...... yes it did! It is back to being a nice quite cruiser again. Im not suggesting you are wrong about your diagnosis of your car but im more suggesting that these F10/11's are very well insulated from the road noise and this stopped me from hearing the sounds of the rear bearings failing over time which lead to them being welded in position. This meant that when the failing bearing finally made enough noise for me to hear it, it was sudden enough to make me think it was the diff instead. Also the rear bearing didnt have any noticeable wiggle which would typically be an indicator of imminent failure. Diagnosing the difference between these two possible failures can be tricky at times and both can be expensive to repair, so for that reason I'd like to say to be sure of what the problem actually is by maybe asking a diff and gearbox specialist to have a look also. Because If had changed my diff out and found it was actually the rear bearings I'd be kicking myself more than a pro goalkeeper at a free pedo kicking competition. Hope you got you car sorted and for a reasonable price too. Happy motoring.
-
Maybe the oils are different. Try an oil change in both using the same oil and filters in both and see what it sounds like. Admittedly its minor but I agree that owners do know the sounds of there cars. I for one can tell just from the sound when my car engine is coming up to oil change time just from the sound.
-
Some helpful info for you https://www.carsaddiction.com/en/wheels/bmw and this may also help https://www.willtheyfit.com/index.php?width=245&aspect=45&diameter=18&wheelwidth=8&offset=30&width2=225&aspect2=35&wheel_size=19&wheel_width=8&offset2=37
-
I have successfully swapped my 2013 530d F11 steering wheel for the paddle shifter and with Bimmercode I turned on the paddle shifters and everything worked perfectly. I did read somewhere previously that if you check a module on the drivers footwell for a wire in pin 15 and if was there then it would be a straight swap and just code it. I didnt check, as I figured it would be swapped anyway and then I would find out if I needed anything else done either way. But in all honesty, I never use them. The car will select the appropriate gear far better and quicker than you can and as Kenny said, 8 gears is a lot of paddling!
-
maybe this will help https://www.willtheyfit.com/index.php?width=245&aspect=45&diameter=18&wheelwidth=8&offset=30&width2=225&aspect2=35&wheel_size=19&wheel_width=8&offset2=37 and possibly this https://www.carsaddiction.com/en/wheels/bmw
-
Hi Kenny, After reading the list I immediately thought the same as Dave, most of these are due to the battery getting low. As Dave said said, clear all faults and see what actually comes back. I have done this thousands of times with BMW's and more often or not you only have one or two faults. My son in law actually used this to get a lot of money off his e90 when he scanned the car on the forecourt of a garage and later found nothing wrong with it. It sounds to me like the place you went to either doesn't have the knowledge they say they do, or else they do, and they deliberately didn't tell you this information. Either way I would find a different place to bring your car. Ask them why on the report it says 'Transmission Management (EGS/SMG) no fault'. Also 3k to refurb the box? sounds a bit much. These boxes are used in plenty of brands of cars around the world and not just BMW, so surely they dont cost that much for a fully refurbed one if it came to it. What symptoms are you getting that brought you to this crowd? Dave, your a very knowledgeable chap, do you have a link for Kenny to a reputable place to download ISTA+? because it sounds like he could use it.
-
Hi Joey, I have the same model of car but fortunately I havent had to change a bulb yet. But lets see if we can help. There is access at the top of the light too but you need fingers like ET to do anything in there. The hatch in the wheel well of mine gives much better access from what I recall. I dont think its actually a bumper off job to change a bulb on these, most cars with access issues usually make the headlight removable but I dont think BMW did that option in this case. Id have a look in the wheel well first. If you go on realoem.com and use your last seven digits of your vin you can find out loads about your specific model, including your lights set up.
-
Hi Mike, I dont know if your capable of carrying out the maintenance yourself as I dont know your skill level but if you did it on your previous cars then there is no reason you couldnt do it on a 6 series. These are a luxury machine so the costs of getting someone else to work on it will be more than a Corolla but Corolla's dont have the same level of tech in them and therefore there are more components that have the possibility to go wrong. Also a Corolla will not drive the same way as a BMW. And as a guy once said to me "if you want the horses you have to pay for the hey". Are they dependable? yeah they usually are, obviously they have occasional faults and you should look on bmw forums to see what they are before buying one but you will notice they are not too bad really once you find one with a good service history and maintain it well. My advice would be get some BMW specific software like ISTA+ and learn from the forums how to use it as it will save you a lot of money if you do end up with any issues. Buy the car and gain the experience and enjoy it. Besides, its only money 😁
-
23 mpg sounds very wrong. Id be looking into that. As Greydog was leaning towards, i'd get a good service done on it. Be sure to do the diesel filter too as this tends to get overlooked. Does it freewheel well? Bring it for a good long drive on the motorway before the service to blow off the dust.
-
This is interesting 🤔 I had the Goodyear runflats which I found very hard, I changed to Goodyear Eagle F1's non runflats 245/45 18' and I like the ride but they are loud. Being thinking about Uniroyal Rainsport 5's. Yesterday I seen Goodyear Eagle LS2 which appear to be only 68 dB's so might be going with these now.
-
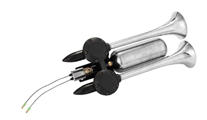
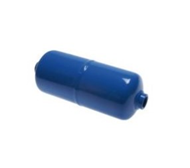
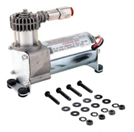
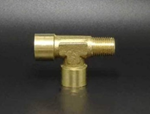
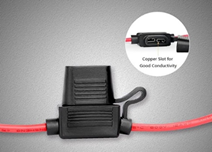
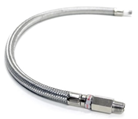
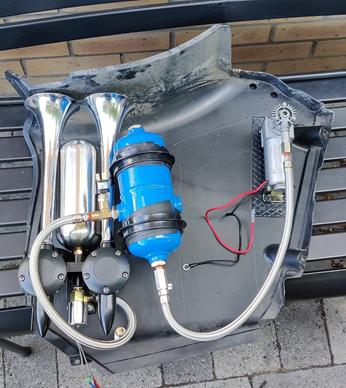
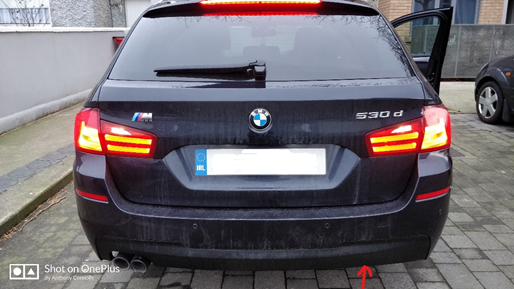
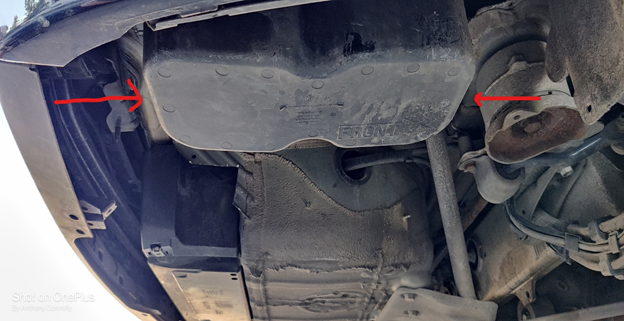
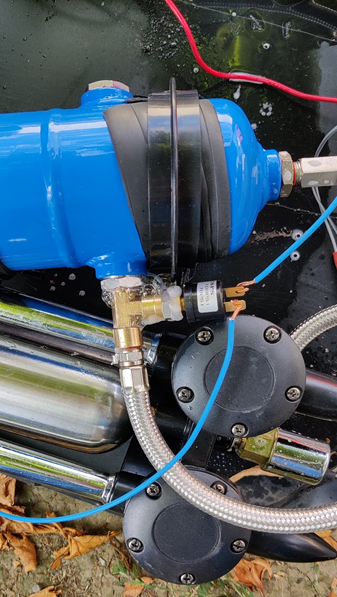
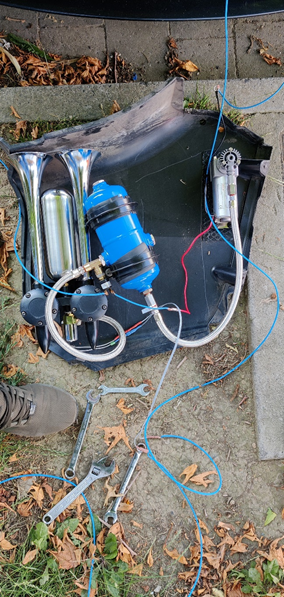
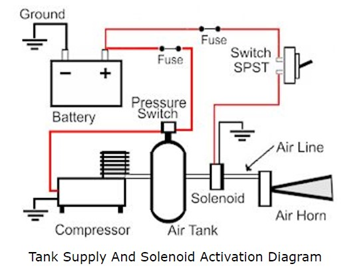
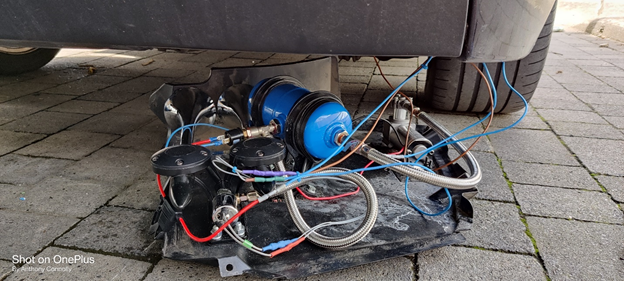
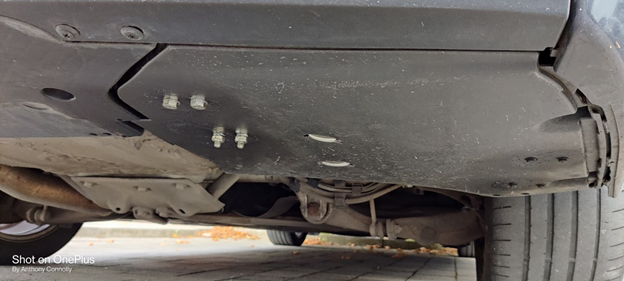
Hey everyone, So I decided I had enough of taxi drivers and cabbages with a license cutting me off and doing dangerous and stupid things on the road in front of me and nearly taken me out of it too. Seen as mounting a machine gun or ram bars on your car to deal with things the way I would like to is illegal so I figured id at least wake them up a little. So as you would have read from the title of this post, I have fitted a train horn (airhorn) to my F11 530d. It was sold to me as a train horn so that’s what I’m calling it, you can call it an airhorn if you like…..you can call it Sally if you like, I’ve started with train horn so I’m sticking with it. So this wasn’t something I was in a hurry to get done, which meant this took a really long time to complete and also it was expensive seen as I changed my mind about how to go about it more than once. What I would advise is, if your going to do this then decide if you want a cheap system or not. If cheaper was your option then buy a complete kits from eBay, these will be the red horn ones with a small compressor for 50 quid. I heard these before and I don’t think they had the grunt I was looking for. The expensive option was to design and build one myself which is what I had to do to get the results I wanted. So here is what I ended up doing. Firstly I purchased a large train horn. The one I chose had a review that said “it makes the Saturn rocket launch sound like a wet !Removed!!” this had me sold. So I bought it. What I was not told was that this will only work as you want it with an reserve air tank. Here is a link to the same kind of horn I purchased Word of warning if you decide to use the same train horn, that reservoir in between the horns makes it sound like a boat horn. This adds a delay at the beginning and at the end of the blast. It kind ruins the surprise. I removed it and put a plug in it and this gave the sudden start and finish to the blast of air. https://www.amazon.co.uk/gp/product/B07Z4B7FJM/ref=ppx_yo_dt_b_asin_title_o01_s00?ie=UTF8&psc=1 Next I decided to purchase an air tank. Now seen as the space in a F11 5 series is limited I decided to go with a small 1ltr tank. Which as it turns out was a smart idea. The original idea was to mount this in the engine bay but as I’ll explain later that changed. As I didn’t know when ordering the air tank how many connections I needed on the tank so I just ordered four, then I could block up any I don’t use. I also didn’t know what size connections I was going to have on everything else and the tank comes with G1/2” holes. So a decision needs to be made early as what sizes connections you intend to use and order in plugs and/or reducers for each fittings needs https://www.ebay.ie/itm/Compressed-Air-Tank-To-11-BAR-Kettle-With-2-Or-4-Connectors-/282885089660?mkcid=16&mkevt=1&_trksid=p2349624.m2548.l6249&mkrid=710-127635-2958-0 Next up was an air pump. So I found this great place to supply these brilliant 12v air compressors. They are simple, quite and seems far more durable than the other sh*t I found online. They sell out of these regularly but if you email them they will put you on the list of orders before the next batch goes on sale. They were very helpful and highly recommended. These compressors run up to 120psi and at a max of 10 Amps. https://www.robotshop.com/eu/en/viair-12v-120-psi-air-compressor.html To keep all this in check I decided to buy a pressure switch to turn off the air compressor when it reached 100 psi and then cut in when the horn is used and the pressure drops below 70 psi. Finding a good pressure switch proved a lot harder. The one I went with works but I don’t trust it, so I will change it at a later date for a better one. This seems very Chinese in construction. But for now it works. https://www.amazon.co.uk/gp/product/B07VRMSWX8/ref=ppx_yo_dt_b_asin_title_o05_s00?ie=UTF8&psc=1 The pressure switch would need to be connected to the air tank but also have a supply from the air compressor so a t-fitting was needed. The one I used ended up leaking because it was made of brass. I changed this out for a steel one which solved my air leak. So I would not recommend the brass fittings. I have attached a link but this is just for illustration purposes. https://www.amazon.co.uk/gp/product/B0811CGRXD/ref=ppx_yo_dt_b_asin_title_o06_s00?ie=UTF8&psc=1 Knowing that I was going to need an inline fuse or two, I made the decision to get them while I thought of it. These ones are really nice feel to them and a good price. https://www.amazon.co.uk/gp/product/B07FVJ7WC8/ref=ppx_yo_dt_b_asin_title_o02_s00?ie=UTF8&psc=1 Finally, I found steel braided air lines for the connections between the compressor to the tank and from the tank to the horn. Remember the supply from the compressor to the tank needs a one way check valve in it. This is not necessary for the other line. These ones are really good quality and the shipping from America was way faster than from the stuff from Germany. https://www.ebay.ie/itm/164468237415?hash=item264b122467:g:kYQAAOSweNpflCeV Ok so those are the parts I used but how are they assembled? If we think about the plumbing part first. The compressor pumps the air out via the steel braided line with a one way check valve into the air tank. It leaves the air tank via the t-piece where the pressure is monitored by the pressure switch. The pressure switch decides when the compressor runs and shuts off (70-100 psi). The air leaves the t-piece and travels through the second steel braided air line (no one way check valve) to the horns where it is stopped by the solenoid on the train horn. When the solenoid is activated/deactivated it allows the air to pass into the horn or not. In the horn there is a reservoir, I would personally recommend removing this. If not the air will fill the reservoir first and thus creating a small build up on sound as the air exits the horn until the pressure fills the reservoir and then the full air pressure will exit creating a loud blast of air. When the solenoid is disconnected and closes the air no longer passes into the horn and the residual air continues to exit the horn leaving the blast fading out until all pressure is gone. Removing the reservoir and putting in a blank cap gives instantaneous blasts of air directly from the air tank. Below is a picture of the way it was originally connected. So where on the car did I set this up? I drive an pre LCI F11, which as you know is the estate version of the F10. I have no idea if this will apply to the F10. I did originally plan on putting the horns in the engine bay on the right down at the back very low but as the tank and compressor had to also go in I changed my mind. This F11 is a single side dual exit exhaust on the left. Underneath in the center is a black plastic box which houses the air compressor for the rear air suspension (yes I did think about connecting to that and no it will not work). On the right hand side is another black plastic box which is empty and probably just to aerodynamically fill the hole left behind from the non-use of the dual exhaust system. This is where I intended to fit the system. The box is held in by a few screws and plastic tabs. In the picture of the plumbing you can see the layout of the box. Note* inside the boot of the f11 on the right is a storage compartment with space for two bottles. This compartment hangs down directly into the area I planned on using for the train horn system. Hence the gap between the compressor and the air tank. You can probably see in the background where I cut a small part of a bracket out to make it the horns fit in, this may not be necessary for you depending on your layout. I changed my tank set up a little which made this unnecessary. I will weld back in the brace later. Some advice. When you decide where to locate the set up and have it all plumbed together, check for leaks. Power up the compressor and fill it with air. I jerry rigged the electrics to do this. You can use a drill battery or a 9v square battery to power the horn solenoid. I’m glad I did. Because I found that the brass t-piece was a weak point and leaked like a cheap plumbers job on a Friday evening. I replaced the t-piece with a steel one and used tread lock on all the treads. Do not use Teflon tape as it will leak and give the thread lock a few hours to set before testing. To test for leaks, get a spray bottle filled with water and a small drop of washing up liquid. Spray it on all the joints and fill the system with air. The top picture shows the t-piece leaking and the bottom one shows the jerry rigging of the electrics just to get the compressor to pump air into the system. Like me, its ugly but it works. PS. Note the sound deadening under the compressor. Now we have to talk about the ugly bit of electrics. There are a number of different ways to wire this up but here is how I did it. Firstly, I would like to point out that if you are wiring up anything with 20-30+ amps you really should use a relay to switch the power. As the compressor I am using only draws a maximum of 10amps, I decided that it may not be necessary. So this is the method I used. Also you will note from the diagram that there are two inline fuses on the positive supply from the battery. The car battery is already grounded but the compressor and solenoid need to be grounded to the body or frame. I used the grounds in the boot behind the right rear light cluster. Good electrical wire is important here and be sure all connections are clean and strong. I used male and female connectors and put heat shrink over the connections to protect them and stop them from coming apart. This also adds the ability to disconnect anything without cutting any wires by just removing the heat shrink. Ideally the use of color coded wires would be ideal. As I had a huge reel of only blue wire, this is what I used. I installed a simple momentary switch on the dash above the small compartment by your right knee and ran the two wires through the cabin of the car along the drivers side door sills to the rear right of the boot. One of these wires was connected to the battery with an inline fuse installed in it. The other wire was connected to the terminal on the solenoid. Either side is fine but the opposite must be to ground. For the compressor power source I connected the compressor directly to the pressure switch and then from the pressure switch via a fuse to the back of the 12v power socket in the right rear panel in the boot. This was a pain because it took a lot of hidden bolts to remove the panel to access the socket. I’ve attached a picture of the rear of the socket to show it’s not as easy as unclipping the socket only unfortunately. So now all the wiring is connected and its technically ready to go. If you were to follow the way I did it then you still have to make it all fit into that small empty area under the rear bumper. This was quite awkward to do but it is do-able. I originally had my air tank held by two pipe fittings found in a hardware shop but as this had a lip around it which stuck out, it was enough to stop the fitting so I took it off and replaced it with some large heavy duty cable ties which worked very well. Sorry I don’t have a picture of that but here is how it was as I connected it up and about to install it. You can see the pipe fittings holding the tank with the large lip around the outer part. If you plan on using a relay here is a useful link to some information you might want on setting one up. Relay Wiring Manual.pdf Ok, so after having it on the car for some time, here are my thoughts. I will revisit this to change a few minor things. I will change the pressure switch for a better one with a higher pressure rating. Maybe 100-120 PSI. I am quite happy with the incredibly loud blast from this monster horn but it is capable of the higher psi, so why not? The compressor is still audible from inside the car but not really loud and it only runs for approx. 10 seconds after a good blast and if completely emptied the tank (this would take a good 8-9 second blast) it takes about 35 seconds to refill, so I’m very happy with that. I could increase the capacity of the tank but after using it for a while I think it doesn’t need it. Removing the reservoir that came with the train horns was a great idea. Its crap with it installed and without it’s as sudden as an erection in the Playboy mansion. So would I recommend installing one? Well, it’s a lot of work and its quite expensive (my one was) but I enjoyed making it and I enjoy startling people with it (especially taxi drivers!) so yes I’m glad I have it. And in case you are wondering about the law moaning about it. It cant be seen on the car and the original horn works as usual so if the boys in blue say anything then I can say it wasn’t me! And finally a video of how it sounds. Gotta say my phone does not do this justice. https://youtu.be/Mjf9TiHq-qo

-
At three times the price it better be real unicorn farts! 😄 Wynnes Super Charge 🤔 gonna have a look for that now, Thanks. " So I asked him why BMW used Poly Bushes on the BTCC cars if they were "un-safe" and pointed out that Meyle were in fact an OEM supplier to BMW." I love catching them out when they say silly things like that. They really do think we are all morons sometimes.
-
"BMW advise no additives to try and hopefully scare you into using "ONLY" BMW recommended Fuel, Oil. Coolant, Tires and these of course should be purchased at the Dealer. If you don't of course your car will self destruct, you will get up one day and it will be a pile of bits on the drive" 🤣😂 "BMW told everyone their gearboxes were sealed for life" I have read the truth from ZF themselves. Also found an approved filter and oil from there site, with the instructions on the correct procedure to perform it too 😁 " BMW now sell their Own Fuel Additives" I didn't know about that! Cheeky B*****DS So what oil additives does your brother in-law use? I have my new oil and filter on order and seen as your brother in-law has done all the testing to back up the additives he used, I'd be very interested in hearing what he uses?
-
I have tried the two stroke oil in other diesels and it does work but also I haven't tried it on a BMW. I have used Liqui Molly Super Diesel Additive recently in my BMW and it did a great job. I'm wondering if anyone can tell me if I shouldn't use these and why? or alternatively someone may have being using these regularly for years with absolutely no ill effects. As you said, Shell V-power isn't frowned upon by BMW so why not use additives?
-
Hey Joe, When I got my dpf done the guy took it off and drilled out the center of the to leave a clear path for the gases but left the outer part of the internals. This is done because in Germany they x-ray your dpf and this could be introduced later. Also a known trick by testers is to tap on the dpf, if it is hollowed out you can hear it but with the core drilled it will pass the tap test 😁 Thankfully it comes with a 12 month warranty and a pass the emissions test guarantee. I like the idea of an LPG conversion 🤔 must look into that.
-
Hi Joe, If the car has being stood still for a long time you should change the oil anyway. Oil becomes acidic after a period of time thats why you are usually advised to change it at a set time or interval. 6k to me is a little more than i do when i change mine. i go for about 5k then change it but i do it myself so no labour costs. I would agree with Greydog about the oil levels, run it and let it sit for five mins then recheck it. Regarding your battery, id say its had its day. If it was 33% in 2016 and now its been standing for a bit, id say its toast. Once again follow Greydogs advice about finding the correct battery but rather than going to a stealership, shop around. There are far better prices around. Fitting one is mechanically easy to do but just a heavy lump to move. Getting it coded to the car is straight forward enough so anyone with any half decent OBD reader could probably do it for you but im sure if you look in the wanted ads you'll find someone who can far cheaper than at the stealership. Im sure you can reduce that quoted cost down. Also check You Tube, you'll be surprised how easy it actually is. Ive had an issue with me EGR due to a sticking roller bearing inside the EGR mechanicals. A good clean and a regrease sorted it but it lead me to seeing the carbon build up in the inlet manifold, which was bad. I removed and cleaned the manifold but more importantly I recently had the EGR blanked, the DPF removed and the error codes programmed out. Been a month now and no complaints. Also purrs nicer now too. Might be worth a thought.
.thumb.jpg.555807fc7d5c059a2b797cdec4cd5bd1.jpg)
