


barrowdad
Regular Member
-
Joined
-
Last visited
-
-
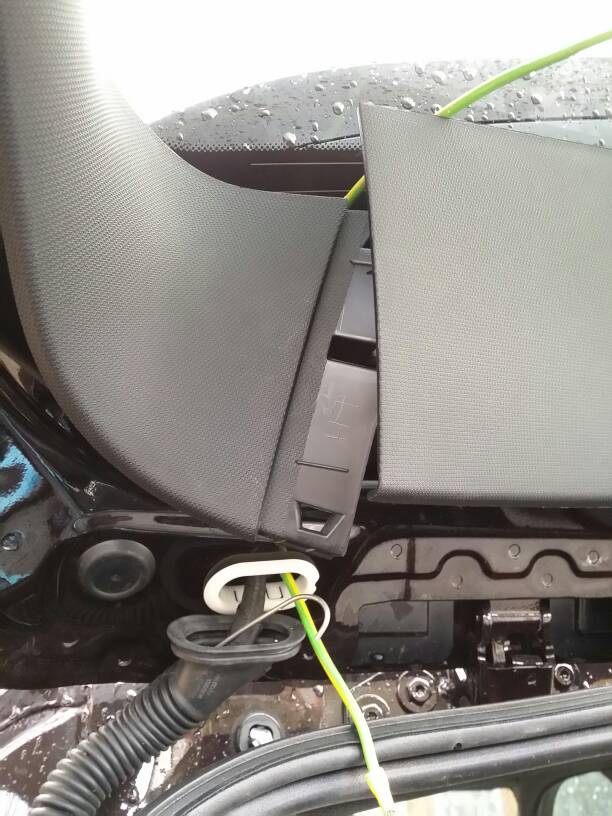
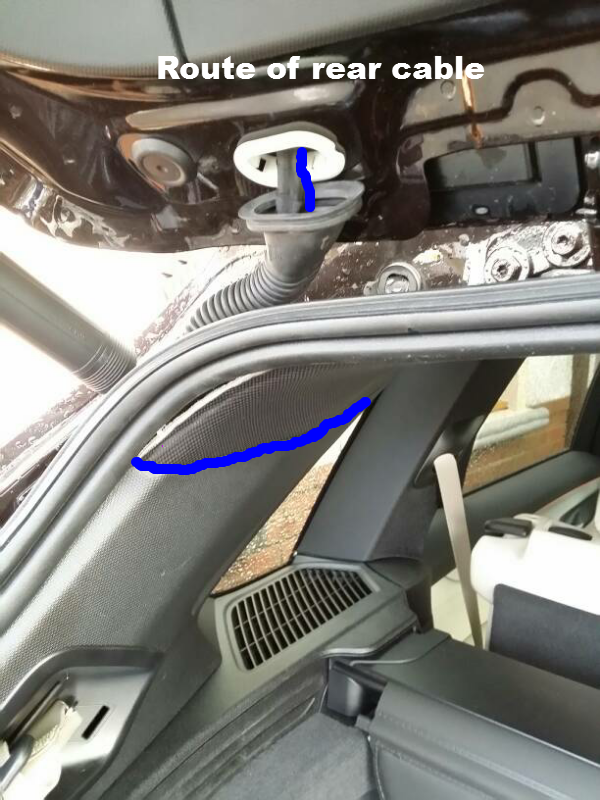
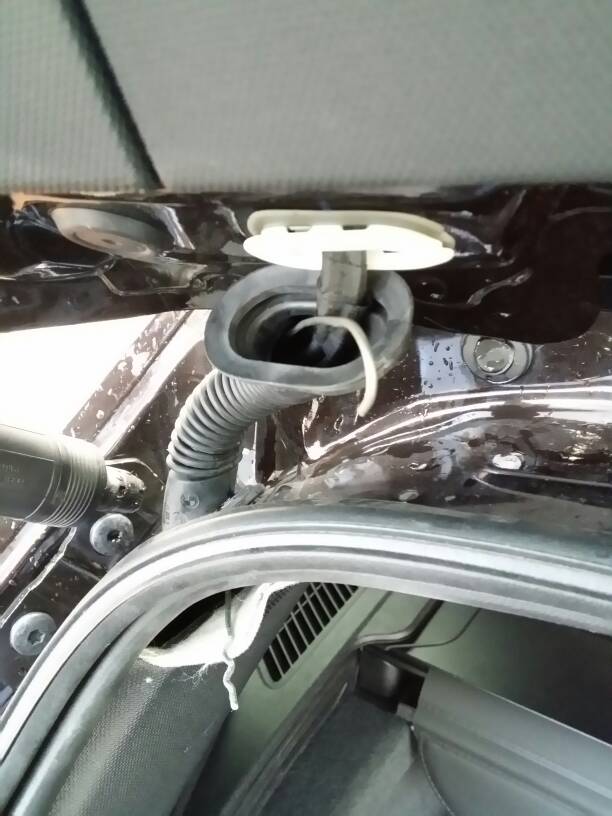
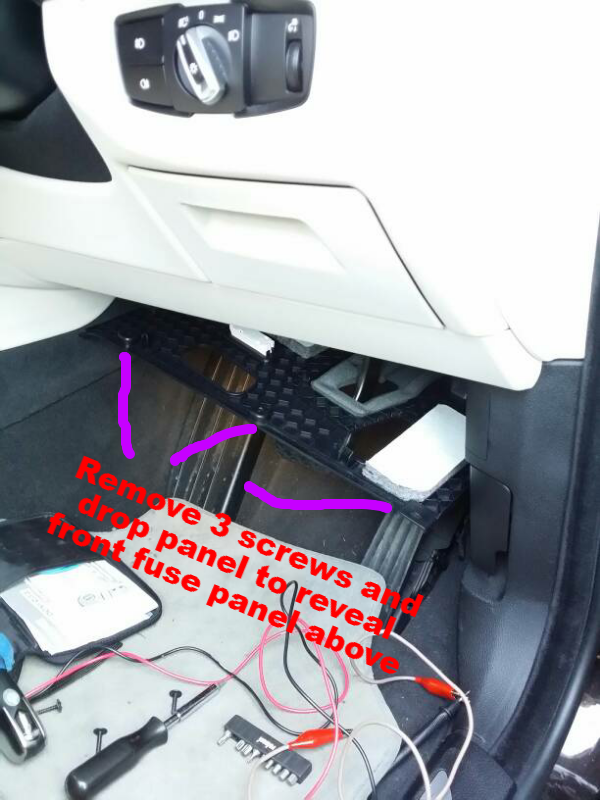
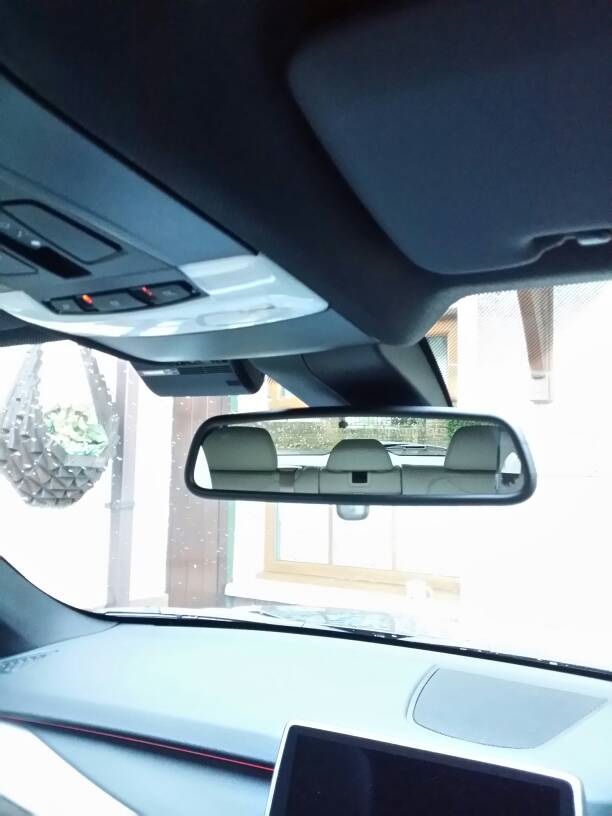
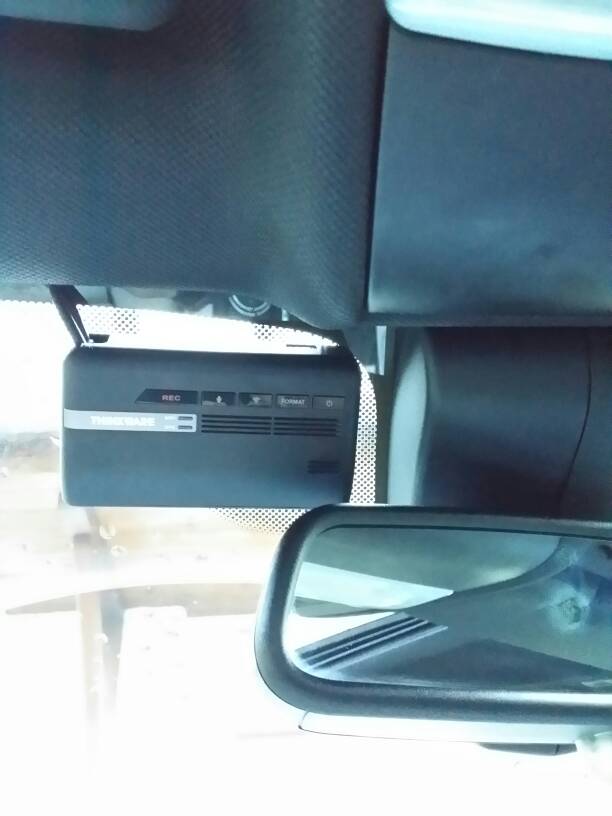
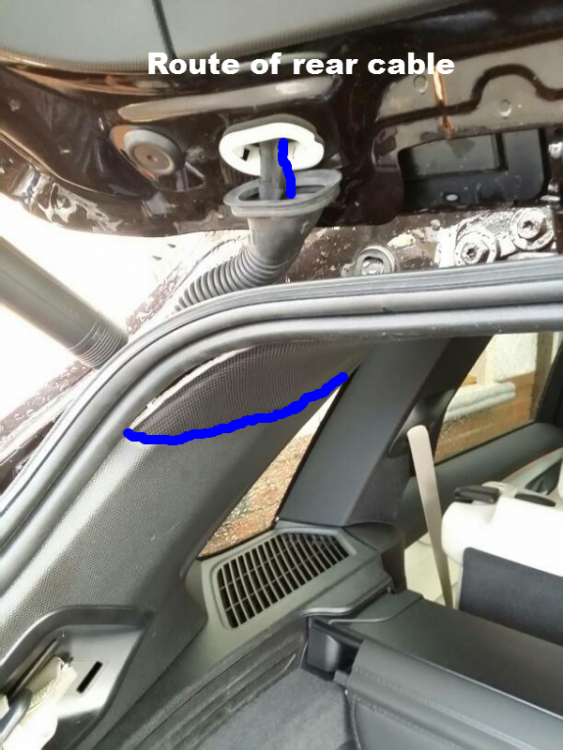
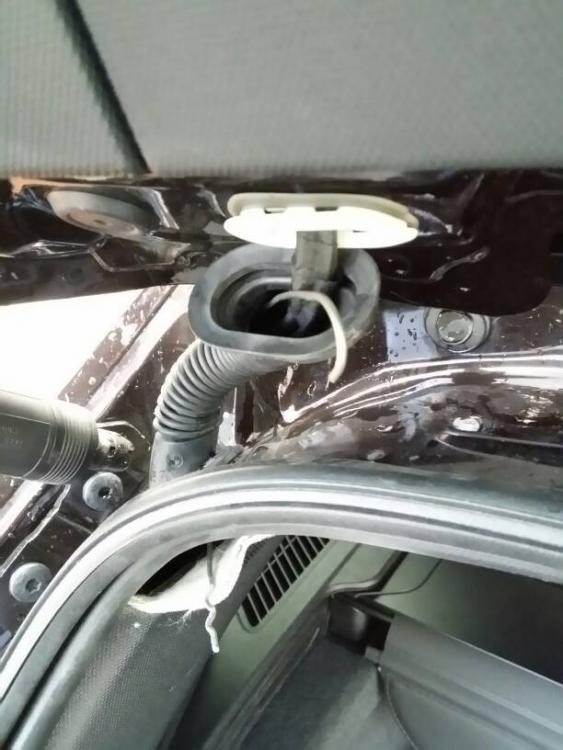
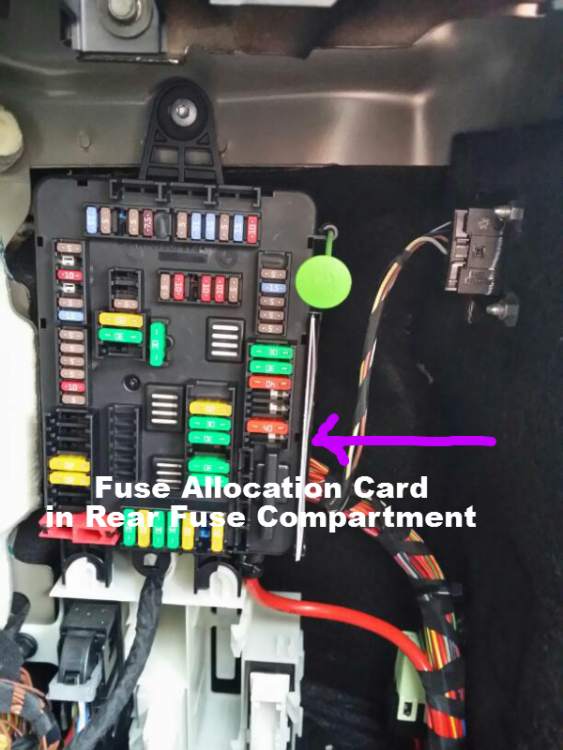
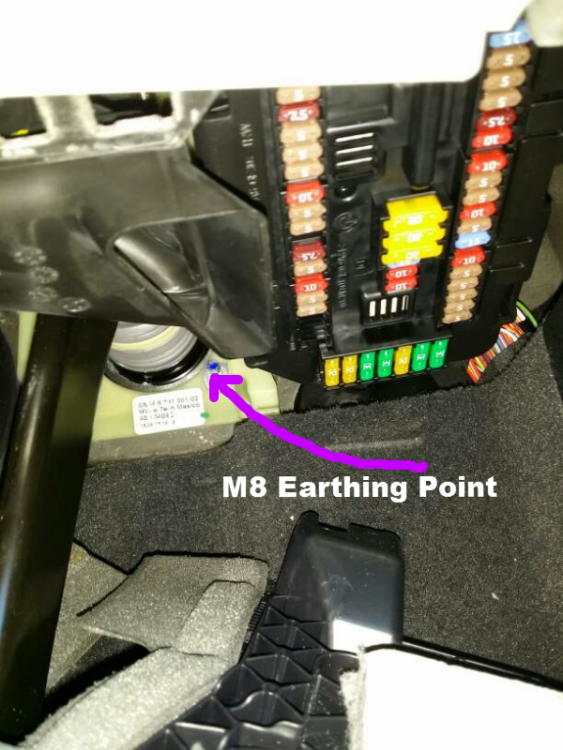
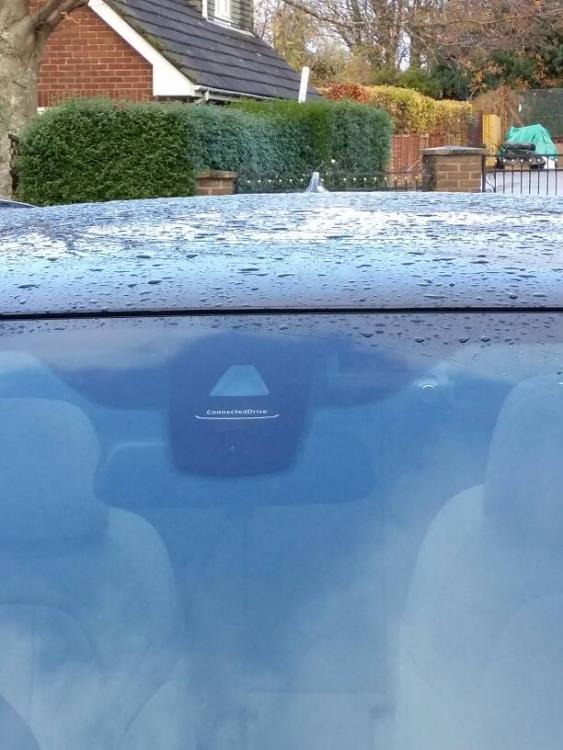
Thinkware F770 Install in 2015 BMW X5 30D SE (F15) This is a diary of events (with some pics and other references) of my F770 Dash-cam installation in my 2015 BMW X5 SE 30D. I'm a newbie so please forgive me is the format and pics don't turn out as well as the might have. Choice of Camera: I did a lot of research of You-tube videos from websites specialising in Dash-cams notably Black-box My Car, US Dash-Cam and Advanced In-Car Technologies as well as looking at the Thinkware website. From this research I decided I wanted to go for the Thinkware F770. Some factors that influenced my decision were: As I intend to use the parking mode I wanted to ensure that there was some control of the inevitable battery drain. The F770 comes with its own battery monitoring sensor built in and can be set to different cut-off voltages. Alternatively the camera parked-recording time can be set by built-in timer. This avoids the need for any third party battery monitoring systems. I don't like the bulk (and to my mind unsightly) suction cup holders used by many other dash-cams. The F770 is fixed directly to the windscreen and is far more discrete and unobtrusive. It also suffers less from vibrations and can be easily demounted. I don't need to have a viewing screen which I feel could be distracting (and in some cases illegal). It has some sophisticated recording auto-save functions. The unit can be purchased as a hardwired system without the need for additional third party add-ons. It gets rave reviews from those who know far more about these things than I do. What system – Single or Dual Channel? I decided on a 2 channel system (front and rear cameras) and the good thing about the F770 is that the rear camera is HD as well as the front. I didn't realise that this is not typical. Plug and Play (cigarette lighter connection to power it) or hardwire? Since the F770 has good parking-mode options i.e. motion detection triggering recording from either front or rear cameras or time-lapse recording (an image taken every second) which is not so 'data-capture hungry' and hence doesn't take up so much memory on the SD Card. I chose the hardwired system as this mode will not work using the plug and play variant. Where to Purchase: Some sites I viewed sold the 2 channel system as a plug and play solution with a 16GB SD card and then invited purchasers to buy the hardwire kit separately at an additional cost of about £30. I looked on line and Amazon had the hardwire kit (sold without the cigarette lighter cable) and a 32GB card on offer for £237 including delivery (I noticed the day after I purchased it the price had gone up to £245). On the Amazon page advertising the F770 there were 2 reviews each awarding 1 star. This had me worried until I realised that the reviews were not related to the advertised supplier (caraudiosecurityuk) and were mainly concerned with the installation and software settings. I phoned caraudiosecurityuk and put these concerns to them. They had not realised that their advert had these comments attributed to it and reassured me that on average they install 2 of these every week and had no problems with the units in fact they view this model as the best high-end model on offer to date. In their opinion the cause of most reported issues were incorrect installation or lack of understanding and implementation of the software settings. I looked at reviews of caraudiosecurity which were very favourable so I decided to order from them. They wouldn't take my order over the phone as it exceeded £100 so I ordered from the Amazon website. The upside is that there is some redress available from Amazon should any issues warrant it and I received the unit from the supplier within 48hrs of ordering which I was pleased with. How to connect it up: From the evidence/knowledge I had gleaned from the internet I knew that the length of the hardwire kit would dictate connection at the front of the car rather than the more easily accessible rear fuse panel or else I would have to extend the connecting cable which I didn't want to do. Locating the front fuse panel had been a problem for many RHD F15 owners but the solution was found by one enterprising owner in Hong Kong. It is under a black plastic panel above the drivers-side footwell. It is secured (in my case) by 3 Torx screws (see photos). Once the panel is loose (I didn't remove it but left it dangling on the footwell light cable) looking up to the right brings the front fuse panel into view. (see photos) Which fuses to tap into? The hardwired lead has 3 wires (yellow for perm live, red for switched live and black for earth). Again the internet provided the answer. The rear fuse panel has a card secreted in the side of the panel (see photo) which gives details of the front fuse panel allocations. As my car is fitted with electrically adjustable seats which can be moved without the ignition on I chose fuseway 27 for the perm live. In case you don't have electrically adjustable seats (not sure if they are universally fitted to the F15) an alternative perm live that might be selected could be fuse 60 which supplies the engine fan. If you chose this then be aware that this is not a mini-fuse and so you will need the full size Add-a-fuse circuit tap. Again, from the internet someone had suggested the Park Distance Control fuse for the switched supply which is fuseway 42. I tapped into these fuses using 'Add-a-fuse' connectors fitting each new outlet with 5 amp fuses. Regarding the Add-a-fuse taps, a point worth noting for those who may not know is that the fuse nearest to the outlet lead should be fused up to suit the new load whilst the other should retain the original fuse. Before connecting the F770 leads I confirmed the power supplies were as expected using a multi meter on the new outlet leads and a convenient bolt located immediately in front of the brake pedal on the bulkhead. All was as expected! Fortuitously I had some Stainless Steel Flanged M8 nuts that fitted the protruding threads of said bolt and this was therefore chosen as the site for the earth connection. Route for Rear Camera Cable: The rear camera cable supplied is 8.9 metres long and has a straight connector on one end and a right angled one on the other. It is important that the right angled connector is inserted into the main front camera unit. The rear camera needs to be installed with the label writing upside down (yeah I know!) which means the Rear camera cable entry would be on the passenger side so I ran the cable along the headlining trim seal all the way to the rear tailgate. The other advantage of choosing this side is the ease of access to the tailgate cable grommet. This exited below the as-fitted tailgate cabling entry grommet which I decided was the chosen route from the car onto the tailgate. I prised the rubber top of the grommet off (don't lever under the white plastic insert or you will break the lugs) and then used the end of a wire coat hanger to feed down the grommet into the headlining gap. I attached the end of the camera lead to the coat hanger with tape and pulled it through. I then prised off the horizontal plastic panel running along the top of the tailgate and fed another piece of wire down through the gap to pick up the end of the camera lead. (See photos). I tucked all the spare cable behind this panel as there was plenty of space. The cable run was totally invisible except for the run across the rear door pillar which was very tight and reluctant to ease out. Despite this the cable blended very well and only the very picky will notice (see photo). Front Camera Position: I positioned mine on the passenger side of the mirror. The Thinkware website makes the point that the lens is offset to the left of the unit so suggests the unit is positioned with the lens as near to the centreline as possible. This would mean the unit would need to be fitted on the drivers side of the mirror. The label supplied with the camera warns about obscuring the drivers vision which this would be more prone to do. I tried out my chosen position with the camera temporarily held in place and took it for a test drive. The resulting footage was 'bang-on' so that's where I've fixed it. The power lead is 8 feet long and with my chosen position was (only just) long enough to reach the front fuse panel and earthing stud mentioned earlier. Here are a few pics of the final installation. The only thing I've done in addition is to use a permanent marker to blacken the silver lens rim which I felt was too conspicuous. Well that's about it for the installation. I will probably follow up with another submission on how it performs and what it is like to live with once I have got to grips using the F770 but so far I am very pleased with it.


-
I have the 2015 F15 30D with factory fit towbar. This comes with an increased towing capacity. I have towed my 1750kg caravan and never had any problems.